Compromise recovery on Qubes OS: individual VMs & full system cases
Occasionally fuckups happen, even with Qubes (although not as often as some think).
What should we – users or admins – do in such a situation? Patch, obviously. But is that really enough? What good is patching your system if it might have already been compromised a week earlier, before the patch was released, when an adversary may have learned of the bug and exploited it?
That’s an inconvenient question for many of us – computer security professionals – to answer. Usually we would mutter something about Raising the Bar(TM), the high costs of targeted attacks, attackers not wanting to burn 0-days, or only nation state actors being able to afford such attacks, and that in case one is on their list of targets, the game is over anyway and no point in fighting. Plus some classic cartoon.
While the above line of defense might work (temporarily), it really doesn’t provide for much comfort, long term, I think. We need better answers and better solutions. This post, together with a recently introduced feature in Qubes OS 3.2 and (upcoming) 4.0, is an attempt to offer such a solution.
We start first with a relatively easy problem, namely recovery of a (potentially) compromised AppVM(s). Then we tackle the significantly more serious problem which is handling the situation of a (potentially) compromised system, including subverted dom0, hypervisor, BIOS and all the other software. We discuss how Qubes OS can help handle all these cases, below.
Digression about detecting compromises
But before we move on, I’d like to say a few words about detecting system compromises, be that compromises of VMs (which actually are also systems in themselves) or the whole physical system.
The inconvenient and somehow embarrassing truth for us – the malware experts – is that there does not exist any reliable method to determine if a given system is not compromised. True, there is a number of conditions that can warn us that the system is compromised, but there is no limit on the number of checks that a system must pass in order to be deemed “clean”.
This means that in many situations it might be reasonable to perform “compromise recovery” for a system or system(s), even though we might not have any explicit indication of a compromise. Instead, the only justification might be some gut feeling, some unusual “coincidence” just observed (e.g. sudden spectacular series of successes of our competitor), or knowledge about a fatal vulnerability that we just learnt could have been reliably used to attack our systems. Or maybe you left your laptop in a hotel room and various entrance indicators suggest somebody paid you a visit?
I’m writing this all to actually make two important points:
-
As we don’t have reliable indicators when to initiate the recovery procedure, it’s desirable for the procedure to be as simple and cheap to perform as possible. Because we might want to do it often, and just in case.
-
Instead of expecting the recovery procedure to reveal compromises details (and let us do the attribution, and catch the bad guys), instead we might want to shift our goals and expect something else: namely that once we performed it, we will start over from a clean system.
Handling AppVM compromises
Let’s discuss first how can we deal with a (potentially) compromised AppVM (or some system VM).
How come a VM might become compromised? Perhaps because of some bug in a Web browser or email client, opening a maliciously prepared PDF file, installation of some backdoored software, or gazillion of other potential issues that might lead to a compromise of an AppVM.
It’s worth reiterating here that the Qubes OS security model assumes AppVM compromises as something that will happen on a regular basis.
I believe that, even if all the sharpest vulnerability researchers could spend all their lives auditing all the application software we use, and finally identify all the relevant bugs, this process would never catch up with the pace at which new bugs are being added by application developers into new apps, or even into newer versions of the apps previously audited.
Additionally, I don’t believe that advances in so called “safe languages” or anti-exploitation technology could significantly change this landscape. These approaches, while admittedly effective in many situations, especially against memory-corruption-based vulnerabilities, cannot address other broad categories of software vulnerabilities, such as security bugs in application logic, nor stop malicious (or compromised) vendors from building backdoors intentionally into their software.
Reverting AppVM’s root image back to a clean known state
Qubes OS offers a very convenient mechanism to revert root filesystems of any AppVM back to a known good state. All the user needs to do is to restart the specific AppVM. This trick works thanks to the Qubes OS template mechanism.
It’s difficult to overestimate convenience and simplicity of this mechanism. Something strange just happened while browsing the Web? PDF viewer crashed while opening an attachment? File manager (or the whole VM) crashed while navigating to some just-downloaded ZIP-unpacked directory? Just reboot the AppVM! If you’re slow at clicking, need to shutdown and start a heavy application like a Web browser, and your CPU is of moderate speed, the whole operation will take about 30 seconds.
The pesky home directory
Reverting the root filesystem of the AppVM to a good known (trusted) state might be a neat trick, but for more sophisticated attacks, especially attacks targeting Qubes OS, it might not be enough.
This is because, besides the root filesystem, each AppVM has also what we call a “private” image (volume). This is where e.g. the content of the home directory (i.e. the user data) is stored. And for obvious reasons the home directory is something that needs to persist between AppVM restarts.
Unfortunately it’s not quite correct to say that the AppVM’s private image
contains only “user data”. In reality it might contain also scripts and programs,
including such that would be auto-executed upon each new AppVM start. Bash’s
~/.bashrc and ~/.bash_profile, or files in .config/autostart/*.desktop are
prime examples, but there are many more. E.g. some configuration files in
various Web browser profiles (e.g. prefs.js). And there are also
Qubes-specific configuration and customization scripts (found
in the /rw/config/ directory). An attacker can use any of these, and probably
many more, depending on which other applications the user regularly uses, to
persist her code within a specific AppVM. Additionally, an attacker can
potentially use bugs in any of the software that is always, or often, run in
the AppVM, such as a bug in Nautilus (file manager) or some PDF viewer.
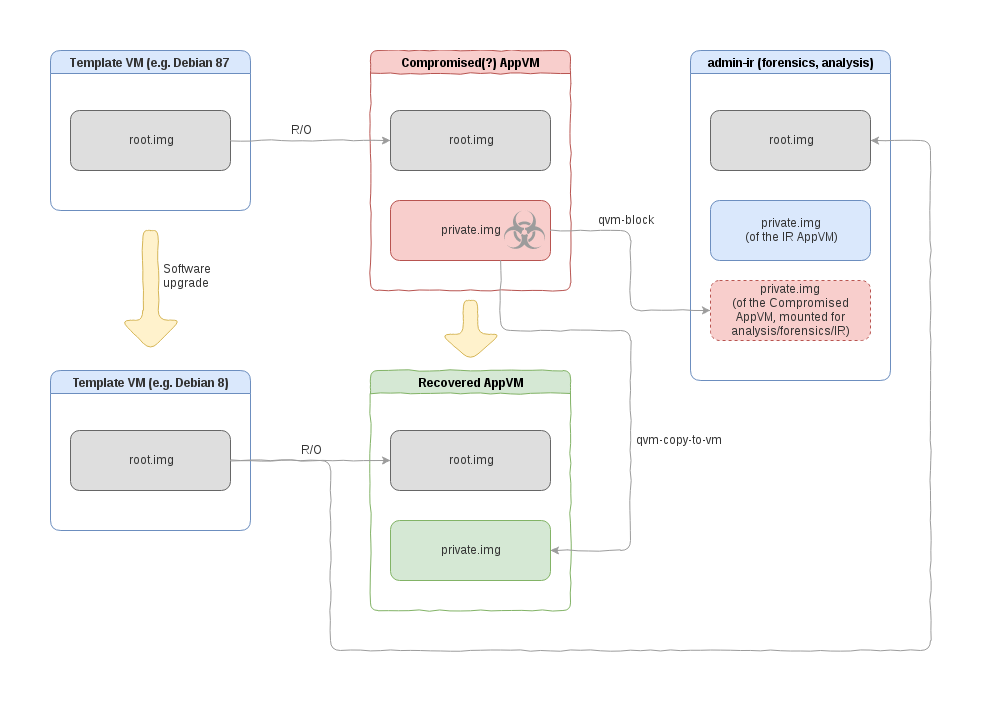
Qubes offers three mechanisms how to deal with this problem:
-
It is possible to mount one VM’s private image as a volume to another AppVM. One can then run whatever malware scanner or investigative software in that other AppVM. This operation is indeed very easy to do:
[joanna@dom0 ~]$ qvm-block -A --ro admin-ir dom0:/var/lib/qubes/appvms/personal/private.img [root@admin-ir user]# mount -o ro /dev/xvdi /mnt/personal/ -
By using Qubes secure file copy operation. Specifically the user might copy the whole home directory to a new AppVM, and then analyze, verify and start using (the verified) data in a new, non-compromised AppVM:
[user@personal ~]$ qvm-copy-to-vm admin-ir /home/user/ [user@admin-ir ~]$ ll ~/QubesIncoming/personal/user/ total 36 drwxr-xr-x 2 user user 4096 Dec 2 21:22 Desktop drwxr-xr-x 2 user user 4096 Dec 2 21:22 Documents drwxr-xr-x 2 user user 4096 Dec 2 21:22 Downloads drwxr-xr-x 2 user user 4096 Dec 2 21:22 Music drwxr-xr-x 2 user user 4096 Dec 2 21:22 Pictures drwxr-xr-x 2 user user 4096 Dec 2 21:22 Public drwx------ 5 user user 4096 Mar 9 13:10 QubesIncoming drwxr-xr-x 2 user user 4096 Dec 2 21:22 Templates drwxr-xr-x 2 user user 4096 Dec 2 21:22 Videos -
By having “cleaning” scripts in the root filesystem (so they could execute before the private image gets mounted/used) which, when activated, would sanitize, clean and/or remove most (all?) of the scripts that are in the home directory. Assuming such cleaning script is effective (i.e. does not misses any place in the home directory which would be used to persist attacker’s code), the user might just 1) upgrade the vulnerable software in the template, 2) restart the AppVM. It’s worth stressing that, as the upgrading of the vulnerable software takes place in a TemplateVM (instead of the compromised AppVM), the attacker who exploited the vulnerability previously, has no way of blocking the upgrade.
The first method described above, while most familiar to those used to do forensic analysis on traditional systems, is also the least secure, because it exposes the target AppVM (i.e. the one to which we mount the private image of the compromised AppVM) to potential attacks on the volume and filesystem parsing code.
The second method (Qubes inter-VM file copy) avoids this problem. But, of course, some method of sanitization or scanning of the files copied from the compromised machine will be needed (remember that the compromised AppVM might have sent whatever if felt like sending!). Some users might want to run more traditional, AV-like scanners, while others might want to employ approaches similar to e.g. one used by Qubes PDF converters. Perhaps in some scenarios even better approaches could be used, e.g. verifying code repositories by checking digital signatures.
The third method has not been officially merged into Qubes yet, and it is unclear how effective (complete) it could be in practice, but some discussions about it, accompanied by an early implementation, can be found on the mailing list.
Handling other system VMs compromises
Much easier to recover should be various ServiceVMs, such as USB- and net- VMs. In most cases these do not require any significant user customisations or data (maybe except for saved list of WiFi networks and their passphrases). In this case their recovery should be as easy as just removing and recreating the VM in question.
One could go even further and imagine that all ServiceVMs should be Disposable VMs, i.e. without any persistent storage (no private image). In this case full recovery would be achieved by simply restarting the VM. Thanks to the Admin API that is coming in Qubes 4.0 this approach might become easy to implement and might get implemented in the 4.1 or later version.
Recovering from a full Qubes system compromise
So far we’ve been discussing situations when one or more Qubes VMs are compromised, and we have seen how Qubes’ compartmentalized architecture helps us to recover from such unpleasant situations reasonably well.
But occasionally we learn about bugs that allow an attacker to compromise the whole Qubes OS system. In the nearly 8 years of Qubes OS, there have been at least 4 such fatal bugs, and this justifies having a designated procedure for reacting to such cases. We look at this method below.
Introducing the “paranoid” backup restore mode
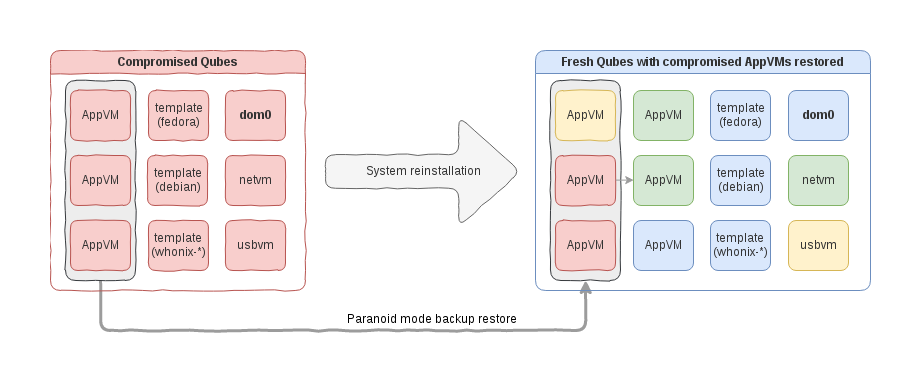
In order to provide a meaningful option for users to recover from a full Qubes system compromise, we have introduced “Paranoid Mode” for the backup restore procedure. (The mode is also known as “Plan B” mode.)
The idea behind this is very simple: the user makes a backup of a compromised machine (running the backup creation on this very machine), then restores it on a newly installed, clean Qubes system.
The catch is that this special mode of backup restoration must assume that the backup material might have been maliciously prepared in order to exploit the backup restoring code and attempt to take over the new system.
Naturally, backup encryption and HMAC-based integrity protection becomes meaningless in this case, as the attacker who has compromised the original system on which the backup was created might have been able to get her malicious backup content properly signed with the valid user passphrase. We discuss how we made our backup restoration code (reasonably) resistant to such attacks below.
Now, without further ado, a quick sample of how this new mode is used in practice:
[user@dom0 ~]$ qvm-backup-restore --help
Usage: qvm-backup-restore [options] <backup-dir> [vms-to-be-restored ...]

Options:
(...)
  -d APPVM, --dest-vm=APPVM
                        Specify VM containing the backup to be restored
  -e, --encrypted	The backup is encrypted
  -p PASS_FILE, --passphrase-file=PASS_FILE
                        Read passphrase from file, or use '-' to read from
                        stdin
  -z, --compressed	The backup is compressed
  --paranoid-mode, --plan-b
                        Treat the backup as untrusted, don't restore things
                        potentially compromising security, even when properly
                        authenticated. See man page for details.


[user@dom0 ~]$ qvm-backup-restore --paranoid-mode --ignore-missing -d sys-usb /media/disk/backup.bin
Please enter the passphrase to verify and (if encrypted) decrypt the backup:
Checking backup content...
Extracting data: 1.0 MiB to restore
paranoid-mode: not restoring dom0 home

The following VMs are included in the backup:

----------------------------+-------+---------------------+-------+---------------+--------+
                       name |  type |            template | updbl |         netvm |  label |
----------------------------+-------+---------------------+-------+---------------+--------+
                 {test-net} |   Net |           fedora-24 |       |           n/a |    red | <-- Original template was 'fedora-23'
      [test-template-clone] |   Tpl |                 n/a |   Yes | *sys-firewall |  black |
          test-standalonevm |   App |                 n/a |   Yes | *sys-firewall |   blue |
                  test-work |   App |           fedora-24 |       |      test-net |  green | <-- Original template was 'fedora-23'
           {test-testproxy} | Proxy |           fedora-24 |       |             - | yellow | <-- Original template was 'fedora-23'
 test-custom-template-appvm |   App | test-template-clone |       | *sys-firewall |  green |
               test-testhvm |   HVM |                 n/a |   Yes | *sys-firewall | orange |
    test-template-based-hvm |   HVM |    test-hvmtemplate |       | *sys-firewall |    red |
         [test-hvmtemplate] |   Tpl |                 n/a |   Yes | *sys-firewall |  green |

The above VMs will be copied and added to your system.
Exisiting VMs will NOT be removed.
Do you want to proceed? [y/N] y
(...)
-> Done. Please install updates for all the restored templates.
-> Done.
[user@dom0 ~]$
After the backup restoration we end up with a fresh system that consists of:
-
Clean dom0, hypervisor, and default system/service VM,
-
some number of potentially compromised VMs (those restored from the untrusted system),
-
some number of clean, non-compromised AppVMs.
The user can immediately start using either of the AppVMs, even the compromised ones, without endangering any other VMs.
However, a few things will not get restored when running in paranoid mode, and these include:
-
Any dom0 modifications, such as the wallpaper and other desktop environment customizations (it’s impossible to sanitize these and securely restore, yet these should be relatively easy to recreate with “a few clicks”),
-
qrexec policies and firewall rules (what good could be these policies if coming from compromised system anyway?)
-
all non-basic properties for the restored VMs, such as PCI device assignments.
It should be clear that any attempt to restore any of the above might easily jeopardize the whole idea of paranoid restoration procedure.
Qubes OS vs conventional systems?
It’s worth stressing the difference that Qubes architecture makes here. In case of a traditional monolithic OS, it is, of course, also possible to migrate to a newly installed, clean system. But users of these systems face two challenges:
-
First, in order to copy the user data from an old, compromised system, one needs to somehow mount some kind of mass storage device to a new, clean system. Typically this would be a USB disk, or a directly-connected SATA-like disk. But this action exposes the clean system to a rather significant attack vector coming from 1) the malicious USB device, 2) malformed partitions or other volume meta-data, and 3) malformed filesystem metadata. All these attacks would require a bug in the clean system’s USB, storage, or filesystem parsing stack, of course. But these bugs might be completely different bugs than the bugs we might suspect the attacker used to infect the first system (as a reminder: we perform all these recovery procedures because we learned about some fatal bug in some critical software, e.g. a Web browser for a monolithic system, or Xen for Qubes).
-
But even if we neglect the potential attacks discussed in the previous point, still we face a very uncomfortable situation: perhaps we just successfully transferred all the data from the old system, but how could we securely use them now? If we “click-open” any of the files, we endanger to compromise our freshly installed system, for the attacker might have modified any or all of our files after the compromise. This would bring us back to the point we started. A traditional solution would be to restore from an earlier, before-the-compromise-happened backup. Only that, as discussed above, we often lack any good tools to determined when exactly did the compromise happen. Not to mention we would need to sacrifice all the recent work when implementing this strategy.
The Qubes mechanism described in this article has been designed to prevent any of these scenarios.
Under-the-hood of the backup restore “paranoid mode”
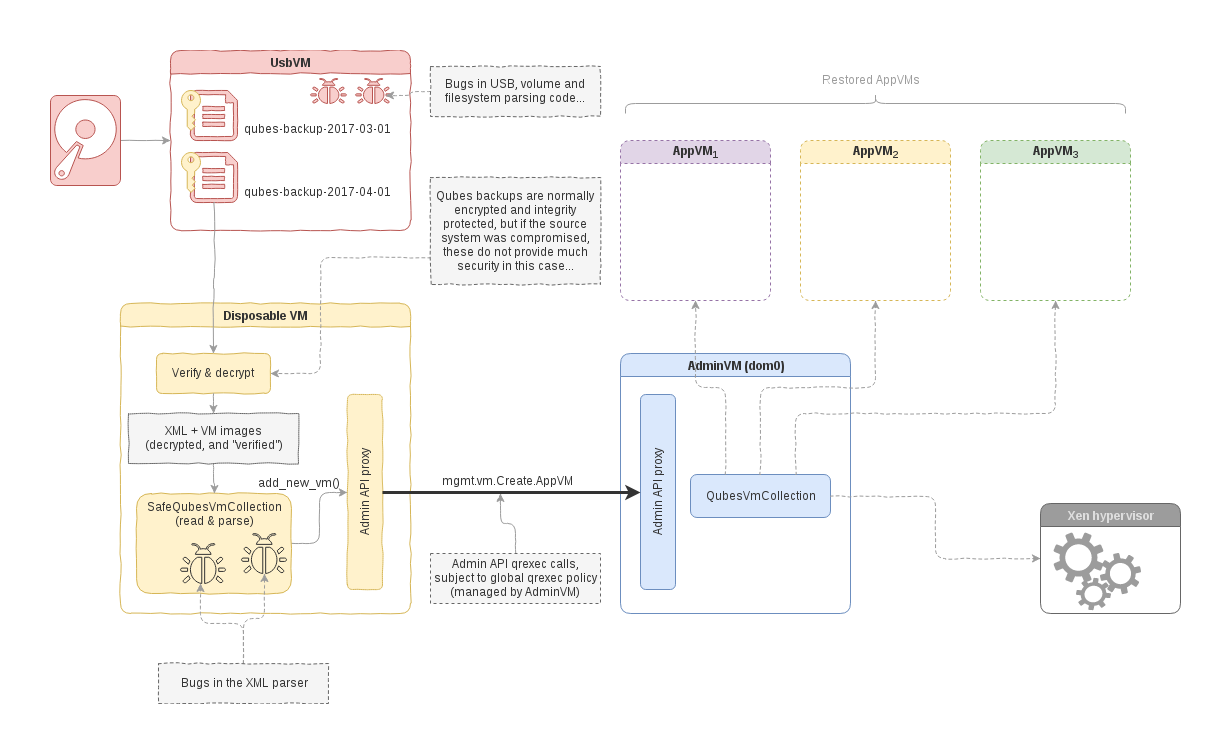
So, how have we designed and implemented this paranoid backup restore mode on Qubes OS? To understand our design decision, as well as the current limitations, it is helpful to realize that we want to avoid attacks coming on three different levels of abstractions:
- System-level attacks (e.g. malicious USB, malformed filesystem metadata)
- Backup parsing-level (e.g. XML parser for
qubes.xmlfile) - Backup interpretation-level (“semantic” level)
Qubes architecture has been designed to prevent level 1 attacks, long before we decided to tackle the problem of malicious backups. This is achieved both through careful compartmentalization, as well as through the actual architecture of the backup system, which assumes that whatever domain (VM) that provides the backup should not be trusted.
Level 2 attacks mentioned above is more problematic. The primary attack surface
in case of backup restore procedure on Qubes is parsing of the qubes.xml that
is part of the backup and which contains crucial information about the VMs being
restored (which template they are based on, which network VMs they should be
connected to, etc). In case of normal (i.e. non-paranoid mode) backup
restoration, even though the backup file is being served from an untrusted
entity (e.g. a usbvm), the attacker cannot control the qubes.xml file, because
the whole backup is crypto authenticated. Unfortunately, in the scenario we’re
considering here, this protection doesn’t work anymore, as explained above.
In order to properly defend against attacks on the XML parser in the backup restoring code, we need to sandbox the code which does the actual parsing. Yet, it’s somehow problematic how such a sandboxed code could still perform its stated goal or creating the actual restored VMs. Luckily, the new Admin (aka Mgmt) API, which we have introduced in Qubes 4.0, is an ideal mechanism for this job.
Unfortunately this API is not available on Qubes 3.2, which means we cannot easily sandbox the backup parsing code there. In this respect we would need to trust the Python’s implementation to be somehow correct and not exploitable.
Finally, there is Level 3 of potential attacks. These would exploit potential semantic vulnerabilities in backup restoration, such as injecting a malformed property name for one of the to-be-restored VMs in such a way that, when actually used later by the Qubes core code, this might result in the attacker’s code execution. For example some properties are used to build paths (e.g. kernel name for PVMs), or perhaps are passed to eval()-like functions.
In order to prevent such logic vulnerabilities, we have decided to write from
scratch special code (SafeQubesVmCollection()) which parses the backup and
creates VMs from it. The difference which makes this code special is
that it only takes into account some minimal set of properties, i.e. those which
we consider safe (for example it ignores PCI device assignments, doesn’t restore
firewall rules, etc). Additionally it skips dom0’s home directory and
implements other limitations, as already mentioned earlier.
One nice thing about the upcoming Qubes 4.0 core stack and
the Admin API is that it is trivial to take this safe backup
restoration code and run it in other-than-dom0 VM, e.g. a Disposable VM. Then,
assuming this VM will be allowed to request specific Admin API qrexec services
(e.g. mgmt.vm.Create.*), everything will work as before. But, this time, the
XML parser will run sandboxed within a VM, not in Dom0, as in Qubes 3.2. This is
illustrated on the diagram below.
Summary
Qubes architecture provides some unique benefits when recovering from compromised (one or more) AppVMs. These include: 1) easy way to revert back to good known root filesystem for all template-based VMs, 2) ability to safely migrate select data from compromised AppVM to new VMs, 3) easy way to recover from compromised system VMs, such as net- and USB- VMs, and 4) ability to reliably upgrade vulnerable software within AppVMs by performing the upgrade in the template, instead of in the (compromised) AppVM, and then restarting the AppVM.
But even more spectacularly, the newly introduced “paranoid” backup restore mode offers a simple and generic way to recover from full system compromises.
FAQ
I don’t get what’s all the fuzz about here? How is this different from any other OS?
Please (re-)read this section and summary section again.
For full system recovery, is it enough to reinstall Qubes OS still on the same hardware?
If our x86-based computers were more trustworthy, or at least more stateless, it would be enough to just reinstall the OS from scratch and stay on the same machine. Unfortunately, as of today, this might not be enough, because once the attack gained access to dom0/hypervisor, she might be able to seriously compromise the underlying hardware and persist malware in such a way that it can survive further system reinstallations.
Wait, I thought Qubes OS offered protection against these pesky SMM/firmware malware?
Correct. Qubes OS, unlike most other systems, has been designed to keep all the malware away from interacting with the real, sensitive hardware, thus preventing various BIOS/firmware attacks (even if the attacker managed to compromise one or more of the VMs). However, once there is a fatal vulnerability in the core software that is used to implement Qubes security model, e.g. in the Xen hypervisor, then this protection no longer works. Sorry.
Alright, but in practice, do I really need to get a new machine?
Unfortunately no one can provide any good answer to that question. Each user must decide by themselves.
Wouldn’t it be easier to just use Disposable VMs for everything?
Unfortunately, the “Just use Disposable VMs” is not a magical solution for all the security problems. In particular, whenever we want to persist user data/customisations/configuration across AppVM restarts (and we want to do that in majority of cases), the use of DispVMs does not provide significant benefits over traditional AppVMs. In some special scenarios this might make sense, like e.g. for the case of service VMs mentioned above. However, it doesn’t seem feasible to have a generic solution that would be able to selectively copy back and sanitize user files before a DispVM shuts down, for later use of these files in another DispVM. And without sanitization, the solution becomes equivalent to… just using a standard AppVM.